As of this month, 2109 is 100% LEDs.
Update (05/18/13): Here is something I hope you will find handy, a comprehensive list of all the bulbs in our cars, their incandescent and LED substitutes. Sample and link at the bottom of this posting.
This upgrade was done over time, sections at a time, and the final LEDs were the rear tail light ones that I put in this week. Now, when I state 100% LEDs, I mean every bulb socket in the car now has an LED bulb on it, with one mandatory exception (on the instrument cluster, discussed below), and of course the headlights (...for now).
Edit (09/11/11): A few of you have been kind of enough to send me some corrections to the Superbright part numbers. I've made the corrections below in italics. Thanks.
Below you will find a discussion primarily related to the maximum current draw that the battery will see by the battery, when the car is off and certain lights are turned (or accidentally left) on - and how to dramatically decrease that load with LEDs. Additionally an LED conversion also assists to remove alternator load once the car is running, as some of those same bulbs and a few others come into play.
Finally in the last section of the write up below you will will find an extensive discussion of all the bulbs used on the car, and at least one example of its LED equivalent.
So onward.
PART I
Wonder what the max possible battery current draw is, on a parked car?
I sure did and asked on DMCTalk.org what was the current draw when the light switch is clicked ON, at the first setting, for a stock all incandescent bulb-ed DeLorean. This would be the reference point.
To summarize, this setting would power and light up:
Tail lamps, Driving Lights: 2
Front Indicators: 2
License plate: 2
Door Lights: 4 (assumes both doors open)
Fender side driving lights: 4
Dome Lights: 2
Cig Lighter, illumination: 1
AC Panel, illumination: 7
Instrument cluster illumination: 5
No takers at the time on that request, but Dave McKeen from
DM-Engineering did quickly respond with a calculated value. I added a few other bulbs to that number, to match the list above, and that is what I am basing my estimate on, as a reference. The value: 6 Amps.
Even on a somewhat beefy 50-60 amp hour battery, that is for sure enough of a battery drain, to prevent a start up in a few hours. Remember that for start up, you need enough juice left for the fuel pump to prime, and for the battery sucking starter to crank the car.
100% LED Comparison
Method to test: Disconnect ground cable from battery. Connect ground cable to one of the multi-meter’s probe, the other probe to the battery. The meter in now in series with the current flow, and setting the meter to read current values, will make it display the resulting current draws. I trickle charged the battery overnight, in order to test with a fully charged battery.
So with all incandescent bulbs replaced with LEDs, I proceeded to test out the current draw. My base line readings were 12.62V and with a standby draw measured at 21mA; that is the current draw of the car sitting parked, doors shut, thus no lights on. That’s a pretty small draw, the only things on at that point are the clock standby power, alarm/keyless receiver, door lock module.
Results?
Now to answer the main question, I clicked the light switch to the first position, and saw the reading go and stay at: 1.25 Amps
Yowza, recall that with incandescent bulbs it was calculated at 6 Amps, so going to LEDs was an 80% reduction in current draw, or 1/5th of the original load, on the battery.
It may actually may be more because this is based on a calculated draw. Oh, and I have some foot well LEDs installed by previous owner, so that's a little draw than a stock car would see.
Want to see more current drawn from the battery?
Just for yucks I went further , here are reading with progressive loads in sequential order.
0.02 A : Car parked, no lights on.
0.17 A : Open driver’s door: (LEDs on doors and two interior dome lights)
0.28 A : Above, open other door as well.
0.42 A : Above, plus engine bay light (also an LED)
1.25 A : Above, and light switch clicked on (All interior LEDs including instrument cluster and exterior driving lights)
8.05 A : Above, and headlights on (not testing LED effect now, just seeing battery loads)
>10 A : Above, plus high beam lights (Ha. Blew 10A fuse on multi-meter).
(Remember, this load is 100% drawn from the battery, the car is not yet turned on to allow the alternator to take over, as well as to recharge the battery.)
Practical values to this?
Well, as i see it, the practical values of LEDs in cars in general, and to 100% LEDs, are:
1. Good way to check and maintain all your light sockets/connections
OK, not truly LED related, but this conversion project will have the benefit that you’ll go through and be able to inspect all your related sockets. I was lucky I only found one socket (front indicator) with some slight corrosion on it (lens was not tight). If you find something like this, depending on the size of the socket, a small file or even a wire brush on a Dremel at low settings would be a good idea. Inspecting all the sockets like this, at the end of the conversion, all your sockets will be refreshed for continued service life.
2. Longer bulb life
Generally a good LED will be at 50% brightness from new for a very long time; however, this is a function of the type of LEDs used, how they are packaged, and how they are used. You will not get a very long life out of a very very cheap LED bulb, and especially if you put in less that office room temperatures; there is a reason for the inexpensive ones, those are cranked out in bulk, and generally suffer shorter service lives. Because I have had good luck for a few years now with thm, I recommend buying from a well established distributor like SuperbrightLEDscom.
Note also that generally the SMD (surface mounted device) LED bulbs that are composed of yellow-ish square chips on a small circuit board, are a higher quality LEDs, are brighter, but more expensive. If you can’t afford to go all SMD LEDs, then consider those at least for high usage applications (e.g., brake lights), or very bright requirement (e.g., engine bay), applications.
3. Larger selection of bulb colors
I’ve seen other owners play with different colors on the doors and the A/C panel and even the instrument cluster, with interesting and novel looks. Note though, sometimes there is a slight up charge on colors. Also, to get away from the blue-ish white and a 'warmer' white, you'll generally have to move to the SMD LEDs.
4. Brighter light output selection
LEDs by default generate a very narrow dispersed light cone. LED bulb manufacturers compensate for this by putting a cluster of multiple LEDs together in different location (radially, top, sides) on one bulb, to both get more light output and better dispersion. In my case I put a 19 light LED in the foot wells, and it is very bright at night and …well that’s the next point. For certain applications, as in the tail lights, I’ve used 39 or 48 bulb LEDs.
5. Much less heat on the housings (applies more to dome lights)
The differences are very great in resulting surface temperatures of an incandescent versus an LED bulb. I measured the dome light in the engine with an LED bulb, and then with the incandescent version. On a 70 degree F day, an IR thermometer on the surfaces showed LED: 81 degrees F, Incandescent: 278 degrees F. LEDs run much, much cooler.
I prevously documented this with pictures on a previous posting.
Posting: "LEDs are cool." After that little test, it quickly became evident why I’ve seen pictures of the engine bay’s plastic housing deformed from the heat of the bulb.
6. Better chance to recover from an accidental dome light left on overnight incident.
It happens, we leave an internal car light on overnight, and that one bulb can take a battery down, especially if the battery is not at full capacity or nearing its life. With LED bulbs, the draw is much less, and you will probably be able to restart overnight on the same conditions.
7. ….and the bling effect:
How about, displaying your car at evening car shows with all the internal, engine bay, and external lights (excluding brake and driving headlights) on? Surely possible and for several hours, with an LED approach.
PART II
Shopping List
If you are interested in converting some or all of your car’s accessory bulbs to modern LEDs, here is a breakdown of the replacement components, along with some pertinent notes.
Going 100% will add up quick, and since this was not an urgent or “must” requirement, I wound up purchasing all the items over a few years, and installing them over that time. The main supplier that I used below is Superbrightleds.com. They changed part numbers a few years ago, and their website is not the easiest to navigate, but the following information will get you there with a few mouse click contributions on your part. Note that when you see an “X” in the part numbers below, this is replaced with the proper code, when you select on the site, for the color of the LED - they use multiple "X"'s for other options, Oh, one more thing about this vendor, they process and ship orders very promptly.
First Some Related Notes & Hardware
Does you car have any electrical issues with respect to lighting? Or, does your car experience large voltage fluctuations? If yours does, make sure you get that addressed first. Most of these LEDs can go as low as 10VDC, but if your electrical system is known to go under that, then consider when you put in LEDs that if you have to replace them because your car's electrical system killed them, the replacement costs for some of these can be relatively high. With that said, as I've worked on my car, and have tuned the car to eliminate hunting and experienced the resulting high/low voltage swings in the process, I have yet to burn out any of the LEDs in the process. So, just saying.
Flasher Unit/Relay: SuperbrightLEDs.COM, CF13GL-02 (Three pin, ground pin on left)
This part, the Hazard/Driving Indicator relay, is a requirement when you convert your front and rear indicator lights (amber ones) to LEDs. The stock relay from the 80’s doesn’t know how to handle the low load requirements of LEDs, so it actually will not make them turn on and off as fed by the turning signal or hazard warning button. A modern replacement that is compatible with LEDs is required. You can find these locally at auto parts store, just make sure it states that it is compatible with LEDs; or, you can add it to your shopping list with Superbrightleds.com (it’s well priced there too).
Approximately : $10-$20 (look for them on eBay as well).
Here is a link to Superbrightleds unit:
Flasher Relay for LEDs
Shown in picture above is the stock (left) relay, and the new LED compatible relay (right). Note when shopping around, #31/Ground is on the left, as shown.
Note: It happened to me, and happened to others as well. The connector on the harness where these plug into has become very fragile over time. The connector will most likely break apart, as you try to remove the original flasher unit. Just make sure you remember or mark the correct pin to wire configuration when you put the new one in, on a damaged socket.
Note 2: One small advantage to having the socket break up, is that you can now use the flasher units with the ground pin on either side - again, just make sure you are hooking them up correct.
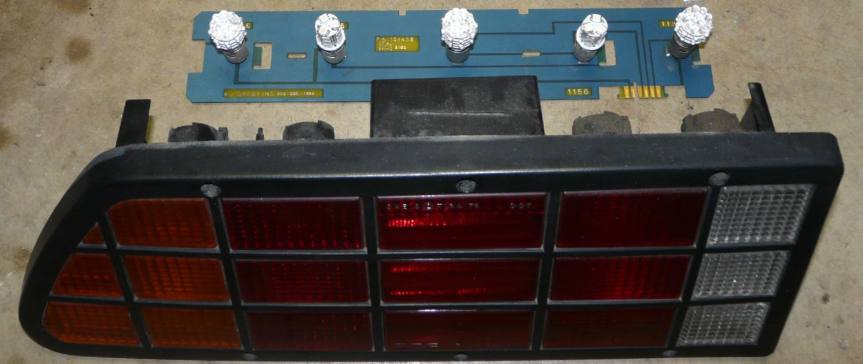
Taillight Circuit boards
The second optional part of this upgrade, is the circuit board panel that hold the tail lamp lights. PJ Grady use to sell (still?) an upgraded, modern board that has over the years received many accolades. My car came with this upgrade and all information presented here was done on these boards. I can’t see why stock boards won’t work for this upgrade, but consider modernizing them if you can, older circuit boards especially if exposed to moisture tend to de-laminate internally and this creates random electrical glitches.
Qty: 2 (they are same for both sides).
PJ Grady
Approximately : $??? They aren’t listed anymore on his website.
DMCH: 101488

If you change your dome lights, you will loose the dimming feature that the incandescent lights have. This is accomplished by a special relay in the fuse/relay area. However,since it uses 80's technology it is not compatible with today's low power, low resistance, on or off states only, LEDs. You have the option to just pull the relay (the white one) and have the LED lights either turn on or off as required, or there consider a direct modern replacement to keep the dimming functionality. DM Engineering designed and sells a solid state replacement relay, which works with either incandescent or LEDs. I am running this module and it works great, it also has a parade feature, where the LEDs can be made to blink on and off. I wrote a pre-review of it here:
"Sneak Preview: Dome Light Module - A Modern Replacement and Upgrade"
Dimmer Module: Module at right, example of solid state circuitry that is inside, of left
Approximately : Please contact him through his website, link above.
LED Kits
If you prefer buying in kits, I am aware of a few:
Approximately : $20
Fender Side Lights in LED: eBay vendor: tcbtexas
Approximately : $20/for the set
If you wish to use a different vendor, or not buy the kits, I’ve listed the individual LED bulbs along with the stock incandescent bulb’s designation, as a reference. Note that there are sometimes multiple designations for the same incandescent bulb type.
Individual Bulb Types
Type: Automotive Bayonet Bulbs
Incandescent designations: 1156, BA15S, 1157, BA15D
One of the most common bulbs for automotive use. It's a bayonet mount, and it comes in either single (1156) or double post (1157) form, the latter (double post) is only used in one location in our cars, the front blinker/indicator lights.
Tail lamps, Brakes:
Note 1: Ideally you want the brightest bulbs here, since they require the bulb's brightness to transmit through the rd lens, for daylight driving. The SMD versions that I’ve put on definitely do the job, but again, are the most expensive bulb here; I chose to only go SMD on the brake lights, since those are used the most in both day and night driving. For the rest of the lights I’ve used the regular multi-LED bulbs and today (in 2011) the prices of a 39 and even a 48 LED cluster bulb version, have very good daylight brightness, and are very reasonable in price.
Note 2: This is a great candidate for an LED replacement. Why? At idle, as in a stop light, take your foot off and then depress the brake pedal and watch the voltage gauge. The brake lights draw a sufficient amount of power from the electrical system that you can watch the needle twitch when they are illuminated. When I went to LEDs the twitch in the gauge is barely noticeable.
Qty: 4
LED: SUPERBRIGHTLEDS.COM, 1156-R18-T, Red (These are SMD, and pricey, but they are the higher quality and this is an application that gets a lot of use. See discussion above on quality and usage.)
Cheaper alternative: Red, GP Thunder GP1156-39R, eBay seller: premiertek_com
Approximately : $5/for a pair.
Here's a picture of the "GP Thunder" bulbs that I am referencing throughout. They are a very recent purchase, and while these are not the highest quality, they were cheap and are being used in low usage applications (reverse, blinkers), so we'll see how they do over time. You can use the picture and specifications to try different brands.
Tail lamps, Driving Lights:
Qty: 2
Incandescent: 1156
LED: Red, GP Thunder GP1156-48R, eBay seller: premiertek_com
Approximately : $5/for a pair.
…if you do a lot of night time driving, these may be also a good candidate for the higher quality, more expensive ones identified above, for the brake lights.
Tail lamps, Reverse:
Qty: 2
Incandescent: 1156
LED: White, GP Thunder GP1156-48W, eBay seller: premiertek_com
Approximately : $5/for a pair.
Tail lamps, Indicator:
Qty: 2
Incandescent: 1156
LED: Amber, GP Thunder GP1156-39A, eBay seller: premiertek_com
Approximately : $5/for a pair.
Taillight assembly, with all incandescent from several years ago.
Taillight assembly today, with all LEDs.
Front Indicators:
Qty: 2
Incandescent: 1157
LED: Amber, GP Thunder GP1157-18A, eBay seller: premiertek_com
Approximately : $5/for a pair.
Note: These are also a great candidate for an LED replacement. Why? Check the notes above about the brake lights.
Shown, LEDs installed in front indicator lights.
TYPE: FESTOON BULBS
Incandescent designation: Festoon bulb, most are L=38mm, I believe the engine bay is L=44mm.
Note 1: Because of their application requirements (low heat and high brightness), I prefer the SMD version of the festoon LED bulbs; however I have provided alternatives below as non SMD verions.
Note 2: These are prime candidate for LED replacements, as the incandescent versions run very, very hot.
Note 3: These “festoon” type bulbs are not always the exact length required, but the socket can contacts can be easily (and carefully) bent to adjust to the proper fit.
License plate:
Qty: 2
L=38mm
LED: SUPERBRIGHTLEDS.COM, 3610-X4 (I went with SMDs here because I wanted brightness and a more of an original color/warm white).
Approximately : $3/each
Alternative: DMC SP11305 (or SP11304, not sure, please ask them if/when you order.)
Approximately : $3/each.
Bonnet:
Qty: 1
L=38mm
Alternative LED: SUPERBRIGHTLEDS.COM, 3710-XHP3 (I went with SMDs here because I wanted brightness and a Approximately : $8/each There is an even brighter version (3710-XHP6), but I am not sure that it will fit (I'll updated here once I know otherwise.)
Alternative LED: SUPERBRIGHTLEDS.COM, 3610-X4: $3/each
Alternative LED: DMC SP11305 (or SP11304, not sure, please ask them if/when you order.)
Approximately : $3/each.
Above is the bonnet light pulled out for a bulb replacement, it comes out easily enough with a little pull on the edges. The picture also shows the difference between "Cool Blue" and "Warm White". The former gives a more modern look, the latter looks more authentic to the original look of an incandescent bulb.
Engine bay:
Qty: 1
L=44 mm
Incandescent: Festoon bulb
LED: SUPERBRIGHTLEDS.COM, 4210-XHP6 (I chose the warm white so “X” was “WW”).
Approximately : $15/each. These are expensive but much brighter (has 6 SMDs) and higher quality than the alternative.
Alternative LED: SUPERBRIGHTLEDS.COM, 39101-x6
Approximately : $2/each.
Alternative LED: DMC SP11304 (or SP11305, not sure, please ask them if/when you order.)
Approximately : $3/each.
Dome Lights:
Carefully pry the dome light housing around the edge, to bright it down to access the bulbs.
Qty 2
L=38 mm
LED: SUPERBRIGHTLEDS.COM, 3710-xHP3 ( for Front & Rear):
Approximately : $8/each These are expensive but much brighter and higher quality than the alternative.
Alternative LED: SUPERBRIGHTLEDS.COM, 3911-x6
Approximately : $2/each.
Alternative: DMC SP11304 (or SP11305, not sure, please ask them if/when you order.)
Approximately : $3/each.
TYPE: WEDGE BULBS
Incandescent designations: Wedge base, Miniature Lamp, 168, 194
Door Lights:
Qty: 6 (4 amber and 2 red)
I've not purchased these individually, but if I did, I'd lean towards this:
LED: SUPERBRIGHTLEDS.COM, WLED Miniature Wedge Base Bulbs, WLED-X5, 220 degree beam
Approximately : $3/each
However, others have listed that they've used these wider diameter ones:
LED: SUPERBRIGHTLEDS.COM, T13-X6
Above are two pictures of the same door light. It's interesting to note that in BOTH pictures, there are LEDs behind the lens. The picture on top were the LEDs that came with the car, they were probably five years old and cost a lot, the bottom picture is the same lens, now with a modern $3.00 LED inside. This really shows how the technology has evolved (brighter and cheaper).
Instrument Cluster:
Qty 15 (There are 16, but you do NOT replace the incandescent battery indicator bulb.)
Of the 15, five are for panel illumination, the rest are gauge indicators, these could be in "Cool White" or "Warm White" or just go crazy with other colors.
LED: SUPERBRIGHTLEDS.COM, WLED Miniature Wedge Base Bulbs, WLED-X5, 220 degree beam
Note 1. The battery indicator bulb MUST remain incandescent or your car will not start – that is the way the car’s electrical system was designed, the bulb is part of the circuit.
Note 2. Others have experimented with colors here, I find that that “cool white” is a little too blue for my preferences with respect to the vintage of the car, so I went with the “warm white” version.
Note 3. For the panel illumination, you need the LEDs to replicate the very wide light angle that an incandescent bulb has. This is because their sockets are at 90 degrees to the plane of the panel, and the light needs to fill in through the sides. The 220 degree beam version LEDs, will accomplish this task.
Of the remaining 10, you will need to get 1 Blue, 1 Amber, 3 Green, 5 Red
LED: SUPERBRIGHTLEDS.COM, WLED Miniature Wedge Base Bulbs, WLED-X1, 90 degree beam
Approximately : $3/each
Note: You don't need a high angle beam for the indicators, since they mostly need the light from the LED to project straight ahead.
Here is a shot of my dash some years ago, with all incandescent bulbs.
This is what it looks like today, with all "white warm" LEDs. It is brighter and sharper with LEDs, but not too bright. I think the 220 degree beam angle really did the trick. I think that in the picture below, though, the LEDs looks more blue-ish than they really are.
TYPE: Small Bayonet A7
Incandescent designation: 3898
AC Panel, illumination:
Qty 7
LED: SUPERBRIGHTLEDS.COM, BA7s-X, color: “cool white”, 100 degree beam. Others have experimented with good results with red ones for the indicator (bottom three) lights.
Approximately : $1/each
Shown above, the AC panel, one of the indicator bulbs pulled out for reference.
TYPE: Small Bayonet A9
Incandescent designation: BA9, 1819, 1829
Fender side driving lights
Qty: 4 ( front: 2, amber; rear: 2, red)
LED: SUPERBRIGHTLEDS.COM,
BA9S-x4-x-12V (Specify R for Red, A for Amber)
Approximately : $2/each
TYPE: WEDGE BULBS, Minis
Incandescent designations: Automotive Miniature Bulb, 17, 18, 37, 70, 73, 79, 85, 86
Light switch:
Qty 1
LED: SUPERBRIGHTLEDS.COM, 74-X, color: “cool white”, 100 degree beam.
Approximately : $1/each
Hazard switch:
Qty 1
LED: SUPERBRIGHTLEDS.COM, 74-X, color: “red”, 100 degree beam.
Approximately : $1/each
Cig Lighter:
Qty 1
LED: Superbright: 74-X I went with green, 100 degree, not much illumination here, perhaps I'd go with white next time, or a more powerful bulb (as long as it is the same size).
Approximately : $1/each
TYPE: ODDBALL BULB
Incandescent: T10, threaded (Edit 06/24/2013: To be more specific, if you are looking for this bulb in an incandescent version search the internet or eBay for "T10 flashlight bulb 12v".)
Glove box
Qty 1
EDIT: Sorry folks, either this bulb changed from when I bought it because now this is exclusively for 9V applications. See below for updated recommendations.
++++++++++++++++++++++++++++++++++++++++++++++++++++++
Approximately : $10/each
The "oddball" a threaded T10 LED bulb.
++++++++++++++++++++++++++++++++++++++++++++++++++++++
Alternative:
Cory W. has identified a possible better and more inexpensive solution here: Alternative source for E10 LED
Also, I am finding that these are very popular in the scale model railroad applications. If you search ebay for "E10 LED" you will find many hits for this LED bulb, and even in different colors. Just watch the volume above the threaded base, you don't want to exceed what is shown in the picture above.
Update July 20th, 2013:
I went into a lot more detail on a new blog entry, on the glove box and LEDs recommended above, details are here: The DeLorean's Glove Box and Lighting
In closing...
I’ve done to the best of my recollection and research, on my own time, to describe as accurately as possible the best fit choices, so don’t be upset if I may have made a mistake along the way and caused you to order something incorrectly. Please assume full responsibility on your order of LED bulbs, your best bet is to pull out the replacement candidate first, and compare them against the picture on the website of your choosing. Doing so, you may also wish to experiment with bigger, brighter, different color, LED bulbs than specified above, just make sure that check the diameter and length for proper fit into the socket(s).
Hope this has been of value and is a future useful reference. I must say that as a result of running all LEDs, I was very pleased with an 80% reduction to the battery, on a the first light switch press, as well as to see a minimal draw at the voltage gauge, while running at idle from the current draw of incandescent brake lights and signal indicators.
Good luck with your LED conversion.

Update, 1 month later:
So I've had 100% LEDs for over a month now, and driving every weekend with this mod. I love that the volt gauge barely moves now when I apply brakes, and when my Son was down from college, he was very surprised at how bright the brake lights were in LEDs.
There are two things though that I should note:
The amber LED bulb cluster, make the rear turn signals a reddish-orange. I think that white LED bulbs may have been better, yet they look great in front.
The new LED compatible flasher relay (as above, sourced from SuperBrightLEDs) makes the hazard and blinking function work perfectly with all LEDs, but note that it is much quieter than the stock unit (which will not make your LEDs blink). If you're playing the radio loud, or just revving the engine high, the click-click sound is not as prominent as on the original.
Update, 22 months later:
All still running well. Prices have come down even further, but the SMD type bulbs are still the better buy, so get those if you can.
As promised above, here is a comprehensive PDF document that lists of all the bulbs in our cars and their incandescent and LED substitutes. Sample and link below. Enjoy.
Update: July 2013
A fellow DeLorean owner, Alex A. (Vin 6575) just published a related blog, in which he shows a similar LED conversion on his car. Others have also done LED bulb conversions on their car, but I encourage you to visit his site, as he has a lot of installation pictures as very good references.
==================================================
If you have a few minutes, be sure to check out the
"Best of" postings of this site. Thanks.


